The Basics of Wildlife Photography
Seeing animals in the wilderness can be a breathtaking experience, but it’s not always easy to convey this beauty in the form of a photo. Dealing with fast moving animals or the “interesting” weather of the North Country can make it hard to snap a good picture. Luckily, practice, plus a few tips, are all it takes, and the North Country is an excellent place to practice. Whether you hail from the beautiful Adirondack mountains or reside in a bustling city, wildlife can be found anywhere - you just have to look for it; remember squirrels, birds, and bugs are wildlife too! While I can’t guarantee you’ll end up being featured in the next National Geographic magazine, these tips are a good place to start and will give you a basis on how to get some nice photos in a safe and respectful manner.
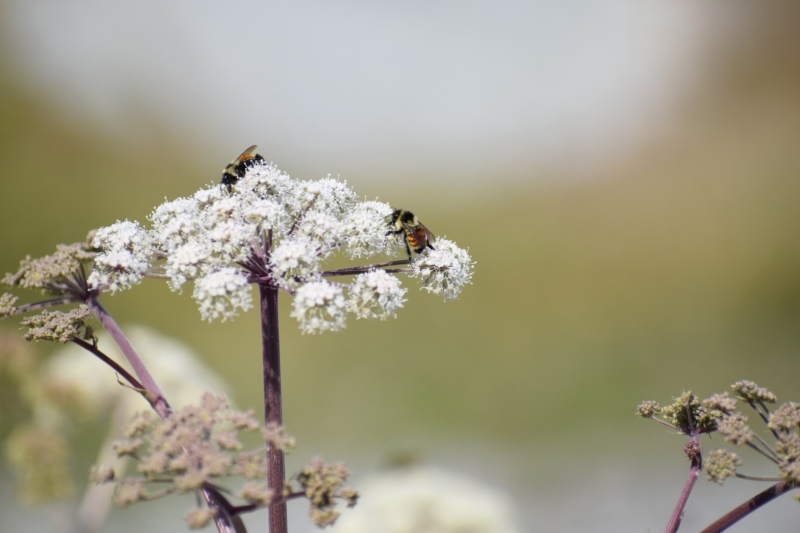
The North Country is full of fascinating wildlife, but not all of these animals make the best or easiest subjects for a beginner photographer. For example, a mama bear with a newborn cub would probably not be the smartest choice to approach for a photo. Likewise, a fox or deer running through a meadow would also be hard to capture without knowing the proper settings on a camera. Instead, focusing on slower moving and “harmless” animals would be a better place to start. Even with experience photographing many of the larger animals seen in the North Country, spiders and insects are still my favorite muses and a great place to start. Many bugs will remain inactive in the colder early morning weather, making sunrise a great time to find and photograph the slow moving insects. Even during midday, spiders on webs and bugs feeding on plants are usually still enough to photograph with little issue. Plus, insects are often overlooked and possess beautiful colorations, making them exciting and fascinating subjects.
If insects and spiders aren’t your cup of tea, there’s no need to get discouraged, many other exciting animals are still out there. Birds are a wonderful subject because of their variety of colors, patterns, shapes, and sizes, and they tend to sit relatively still on perches or branches. The main difficulties that I’ve found with photographing birds are trying to catch them at eye level and getting close enough to take a good picture. An easy solution to this problem is to try and attract more birds to your own property. Bird feeders are a very effective way of doing this and can yield some unique photos, especially if the perch on the feeder resembles a branch or if the feeder is placed close to other branches that the birds can land on. However, it is worth noting that the New York State Department of Environmental Conservation strongly recommends that bird feeders be taken down between April 1st and November 30th due to their tendency to attract bears. The recommended times to keep your feeder up are colder, winter months when birds are looking for more food and bears are hibernating and thus less likely to interfere with the feeder. It’s also important to respect these suggestions for the safety of the bear. By enticing bears onto residential property, they are more likely to become involved with humans and therefore get hurt or be euthanized if they get too close to civilization. If you really want birds visiting your property in the summer months, try planting colorful flower gardens and putting out bird baths.
While birds and insects are wonderful and beginner-friendly subjects, it’s not surprising that most people want to try their hand at photographing animals that are a bit more reclusive or dangerous. Just being able to capture these animals existing in the wild is beautiful, not to mention that the charismatic nature of these animals makes them niche subject matter in the realm of photography.While I don’t recommend starting your journey seeking to photograph these wildlife, here are some tips on how to not just be safe but to be respectful to wildlife.
- Don’t get too close to the animal. It can be tempting while photographing to move close to wild animals in order to get a better quality photo, however getting a slightly better resolution on a photograph is not worth risking your own safety or that of the animal. By moving closer to animals, they might start to feel crowded or cornered, making them more likely to react negatively to your presence or attack in self defense. There is a general rule of thumb when photographing larger animals which is if you hold your arm out fully extended and make a thumbs up, and if the animal is bigger than your thumb, then you’re too close. You don’t want to be the next person on the news who tried to take a selfie with a moose and didn’t live to tell the tale. Remember that these animals do not know your intentions and might assume that you are dangerous to them. There is no way to overstate the importance of treating wild animals with respect.
- Don’t take a pet with you. While pets can be great companions on hikes and even great subjects to photograph if no wild animals wish to be seen, if your plan is to photograph any kind of wildlife, I would not recommend bringing a pet. Many times pets can be reactive towards wild animals and while in some cases that might just result in scaring the animal away, other times it can instigate aggression towards you and your pet. If you plan on photographing wild animals, it’s best to leave pets at home.
- Allow the animal the option to leave. Even if you are far away from an animal, you don’t want to follow it through the woods if it is continuously moving away from you, and you never want to block its exit. Regardless of if the animal is dangerous, both of these actions can stress the animal, making it more likely to injure itself or you.
- Educate yourself on body language and respond accordingly. If there is a specific animal you’re planning on photographing, take some time learning about how that animal expresses fear, aggression, and warning signs. Once you’ve educated yourself on these mannerisms, make sure to keep them in mind while photographing and if any of them occur make sure to back away from the animal and allow them to leave or you find somewhere else to go if the animal isn’t moving away. Even though certain warning signs can look cool in photographs, such as a rattlesnake shaking its tail, this body language suggests that the animal is preparing to strike and it is certainly not a good idea to stay near an upset animal regardless of how cool the images might turn out.
Now that you know what animals to look for, how to find them, and how to respect their boundaries, let’s talk about actually taking the photos. There are many settings that go into creating the perfect photo, however, there are a few main ones, which are the F-stop (aperture), ISO, shutter speed, and autofocus. It’s important to note that most of these setting manipulations can’t be performed easily on an iPhone so this will mostly apply to those using a DSLR camera. This isn’t to say, however, that great photos can’t be taken with the automated settings found on an iPhone or without manipulation of these settings on a DSLR! Now onto the settings:
- F-Stop / Aperture: This setting controls how much light is entering the camera by manipulating how large of an opening there is in the camera shutter. The higher the F-stop, the larger the depth of focus.
- ISO: this setting dictates the camera’s sensitivity to light. The higher the ISO the brighter (but also more grainy!) the picture will be. In my opinion, it’s always good to keep ISO as low as possible, but in some situations it may be necessary to use a higher ISO in order to get adequate lighting.
- Shutter speed: this setting is pretty self explanatory, the shutter speed dictates how fast the camera takes a photo. The faster the shutter speed, the shorter the amount of time passes for the camera to take a photo. If you’re photographing a fast moving animal, having a high shutter speed is key.
- Autofocus: there are many different types of focusing options on cameras, however, one of the more helpful options is a moving or subject locking autofocus. With this kind of focus, the camera constantly changes the focus to ensure that the subject is sharp. Similarly to shutter speed, this setting is helpful when photographing fast moving animals.
Now that you’re familiar with the settings, types of animals, and how to be respectful, you’re ready to try your hand at wildlife photography! Remember not to get too frustrated if the first few photos don’t come out exactly how you want, photography is a learnt skill and it can take time to master, especially with subjects who you can’t direct. Make sure to be mindful of respecting the wild animals and the environment surrounding you and have fun!
This blog was written by Spring '23 Community Based Learning student in the First-Year Seminar Class "From Farmyard to Pets" taught by Karen Gibson.